Saturday, 2 April 2016

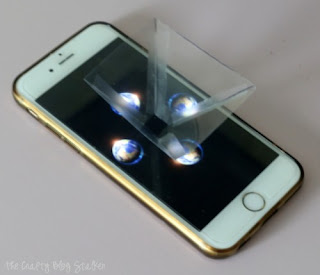
how to make a hologram with your smartphone

Live 3D Holograms are the things of the future. We all have seen people using 3D Holograms in Movies, but have you ever wished to see on for real in front of you. Well, now you can.
In this IBUVIRUS I will teach how to make Mod your smartphone to make a 3D projector out of it by keeping just a little device on the samrtphone screen, which can be made of materials available at home.
You can view this 3D Hologram without the help of any glass, all you need is a smartphone and the small device, which I will teach you to make.

Step 1:- Materials Required

how to make a hologram with your smartphone

->Graph paper
->CD case
->Marker
->Pen
->Pencil
->Pair Of Scissors
->Sellotape and/or Superglue
->Craft Knife or Glass Cutter
->A Smartphone


Step 2:-Extracting The Blank Plastic Side From CD Case

how to make a hologram with your smartphone

STEPS (Refer to images for further help):
  1. Take out the Paper Cover from the CD Case
  2. Cut the Plastic Cover on top of the CD Case
  3. Cut the CD Case from between to get the blank side of the cover, i.e. the side opposite to the side where we keep CDs.
  4. Now you have successfully retrieved a thick plastic sheet from an old CD Case

Step 3:-Tracing The Trapezium

how to make a hologram with your smartphone

Step 4:-Cutting The Trapezium From The Plastic CD Case

how to make a hologram with your smartphone

Using the graph paper cut-out we got from the last step, trace the trapezium on to the Cd Case using the Marker. Refer images to get a more clear idea of what you're reading. Repeat this step 4 times
Using the Craft knife or Glass Cutter cut through the Marker lines and as a result you will get 4 trapeziums.
With the completion of this step you have completed 90% of the work.

Step 5: Making A Plateau prism

how to make a hologram with your smartphone

Imagine a prism (Pyramid) with the top chopped of, what you get is a plateau prism. We are trying to create something exactly like that.
STEPS:
  1. Tape these 4 trapeziums together and, what you get would be exactly what we need. But, if on taping what you get is nothing like a prism but just a flat shape, it means that you did not cut the shape(s) correctly in the last step and made some mistakes which led to formation of trapezium with wrong dimensions, recheck your measurements.
  2. Apply glue/superglue, where the non-parallel sides meet (Place where you applied tape) and let it dry.
  3. If you are happy with what you get, you may remove the tape. [I did not, as it makes no difference]

Step 6: Making the Projector Work

how to make a hologram with your smartphone

STEPS:
  • Just place the prism upside down (Broad side on top) on the centre of the screen at the point where you see 2 white lines intersect at the start of any video. (Refer to image for more clarity).
  • Play the video and watch he magnificent 3D Image formed.

THE END

how to make a hologram with your smartphone

Read More

Sunday, 20 March 2016

5 Android Apps To Protect Your Phone From Criminals

Mobile security is a major area of concern for personal as well as corporate users. Since Android powered phones occupy the largest share of the smartphone market, they are increasingly being targeted by hackers and cyber criminals. With this increase, there is an increased chance that you too will encounter malware. So, what can be done about it?


You can install some security apps available to prevent malware from stealing your private information and causing data loss. Here are five such free apps to help prevent malicious software from harming your Android smartphone:

1. Avast Free Mobile Security
The Avast Free Mobile Security app offers anti-malware and anti-theft features. If a malicious website is visited while surfing, this application will warn the user. This application will also identify potentially dangerous applications that may be installed on the Android device. SMS and call filtering allows users to block incoming messages and unwanted calls based on contacts and specific time of day that people call.

Avast is known for its firewall and enhanced anti-theft features. This application can perform full scans on installed apps and also on the SD card. The scans can take place manually or automatically.

2. AVG Mobilation Anti-Virus Free
AVG Mobilation Free helps to prevent viruses and malware from infecting your phone. This anti-malware software offers theft protection to protect against unexpected losses. This app also offers track and control capability that will allow consumers to find their phones if they are separated from them. The phone’s data can be locked or erased remotely.

Users can make calls, surf the web, download music and apps safely with the use of this security app. The app scans files, settings and web activity for potential malware. SMS inbox is also protected againsthackers and scammers.

3. Lookout Mobile Security
Lookout Mobile Security offers free malware protection and backup for contacts. This application also provides remote locating for phones and tablets. If the account is upgraded, features such as  App Privacy manager, image backup, remote locking and remote data erase are available. Scans can be conducted on daily or weekly basis. Data may also be backed up on the Lookout servers. Most users back up call history and pictures. The most recent activity on the phone can also be seen.
4. Norton Mobile Security Lite
Norton Mobile Security Lite offers free malware protection for Android users. This application also features remote locking and remote locating. Norton Mobile Security Lite offers browser protection, remote camera control and a remote alarm .

If the phone is lost, the device data may be erased remotely. The remote functionality is initiated by SMS text commands. The application checks for virus datanase updates weekly, and it can be updated more or less frequently. The focus of the application is to provide anti-malware and anti-theft services. SIM cards are not protected with this Android security application.

5. NQ Mobile Security
NQ Mobile Security is another free anti-malware application. This security application features a firewall, contact backup and remote location functionality. The traffic monitor tracks data usage. An app optimizer ensures that applications are performing at the phone's full capability.


THE END

5 Android Apps To Protect Your Phone From Criminals

Read More

Tips to Keep Your Android Mobile Phone Safe

With the amount of information we keep on our smartphones, it's increasingly vital that we protect them and the data they house. I don't want to sound like a fear-monger, but the fact is your phone can be lost or stolen, it can be destroyed, or its contents can be hacked via malware. Here are a few basic and advanced tips to consider to protect everything from your work files to contact information.

The Basics: Keep Your Phone Locked
It's extremely easy and effective to lock down access to your Android phone using built-in tools. Simply tap your way to the "Location and Security" setting. There you can create either a standard password or a screen lock pattern. If you use the screen lock pattern tool, be sure not to make an extremely easy and obvious pattern.

For Added Security:
 Hidden Lock adds an extra layer of security that is easy to implement but hard for would-be thieves to crack. After you have unlocked your phone using a password, Hidden Locks requires you to tap a hidden button before you can use the phone.

Avoiding Malicious Apps
Viruses and other malware are increasingly targeting the Android platform, so it's important to take a few precautions to avoid infecting your own phone or tablet.

For the ultimate in security, I recommend only downloading apps from the official Google Play store, where they have been vetted. Scammers have been known to create fake versions of popular apps, which are loaded with malware and only available at third-party websites.

However, some apps may simply not be available on the app store. If you see an intriguing app, you can verify its reputation by searching for it on Google and seeing if it has been written about, positively or negatively. Be wary of totally obscure apps.


Note App Permissions
Take the time to learn what permissions an app wishes to access, from making phone calls to using your system tools. While it makes sense that a social networking app may wish to access your contacts, it doesn't make sense that a "dancing dog" app would. Be wary when apps ask for more than seems to make sense.


Consider an Anti-Virus
Finally, you can consider an anti-virus program for Android. Savvy users may not need these programs, but apps like Lookout Security & Antivirus do offer powerful features for added protection.


Find Your Lost Phone and Erase Data Remotely
Thanks to GPS and wireless Internet, you can locate a missing Android phone using one of the several apps available. I recommend Android Lost (free). Even with your speakers turned off, you can use this app to play a sound, which is handy when you simply lose the phone in your house. Furthermore, this app also enables you to erase all the phone's data, saving your contact information and files from prying eyes.

You can also take pictures from your camera to know who is using your phone. And better yet: This app can be installed remotely, so you can install it after you have lost your phone. (However, I strongly recommend installing it right away.)


And Don't Forget Physical Mishaps

All the security measures in the world won't matter if your phone breaks from a simple drop. Be sure to invest in a quality case.

THE END

Tips to Keep Your Android Mobile Phone Safe

Read More

Increase Battery Life on Android Mobile Phones

Anyone who has a smartphone knows that battery life is an issue. At the moment, the smartphone industry tends to favor performance over battery life when developing specifications for their new devices. To be perfectly honest, I am all for this. I would argue that it's better to have a zippy phone that acts quickly when I need it to rather than a slow, less sleek device that can withstand a few days of use without charging.

This is probably because I've mastered getting what I need from my phone while using the smallest amount of battery resources possible. Getting the best battery life from your phone can be somewhat complicated because everyone has a different opinion on what you should use and which (if any) features you should sacrifice to conserve battery. Fortunately, I have a simple method that works for every Android phone I've ever encountered.

Display Screen

As a universal fact across all phones, the biggest drain on your battery is your display screen. Personally, I've found the auto-brightness control to work extremely well. To adjust to auto-brightness, go to  
SettingsàDisplay settingsàBrightness, and then just check Automatic brightness. It dims the brightness when you're in darker rooms (as it doesn't need to compete against other light sources and glare), but will really up the brightness if you're outside so that your phone is actually usable. However, if I'm really trying to conserve battery, I will turn off auto-brightness and set the brightness to very low (around 25%).

Also, be sure that you don't have an extremely long timeout (inactivity time before your screen automatically shuts off) as this will drain your battery. I personally just prefer shutting the screen off manually by pressing the power button rather than waiting for a timeout; this way my phone won't timeout on me when I am just reading something on it.

Live Wallpapers

Live wallpapers have a considerable impact on your battery life. Not using them is always a good idea if you want the best time from your battery.

Close Unnecessary Applications

If your phone has some applications running that you are not currently using, you should close them from the Task manager to avoid putting unwanted pressure on your phone which in turn will cause your battery to drain quickly.

Reduce Volume of speakers

Lowering volume of your phone's speakers can also have noticeable improvements in your phone's battery life.

The Power Control Widget

If you have a fairly recent phone (anything running Android 2.1 or higher), you are already blessed with a completely awesome "Power control" widget. If your phone does not have this widget, you could always download one from the Play store. This is a must for your home-screen. With this widget, you can enable and disable WiFi, Bluetooth, GPS, and Auto-sync in addition to adjusting brightness levels between auto, low, medium, and high.

The only thing this widget left me wanting was the ability to enable and disable mobile wireless networks(3G and/or 4G network). Some phones allow you to do this by pulling down the "status bar" at the top of your phone (where notifications, battery life, and signal are) and selecting or unselecting "Mobile data." Other phones allow you to control mobile wireless networks by holding down the power button. Worst case scenario, you can adjust it in "Settings."

Now, when to enable and disable these features, all boils down to preference. I only use Bluetooth, WiFi, and GPS as I need it; otherwise it's off. If you have a WiFi connection available, it's generally better for your battery to use it rather than using your mobile wireless network (especially if you get poor signal for your mobile wireless).

THE END


Increase Battery Life on Android Mobile Phones

Read More

Useful Keyboard Shortcuts for Windows Computers


While most of us are already aware of obvious keyboard shortcuts like “Alt+F4” and “Ctrl+C”, there are some obscure shortcuts which most of us tend to overlook. These keyboard shortcuts are not only useful for the average PC user but for advanced users as well. This article contains many such amazing keyboard shortcuts which if used properly could save a lot of time and effort. So let's get started.

Windows key+D: This shortcut is the keyboard equivalent of “Show the Desktop”. It is useful for quickly minimizing every open window when someone walks in and you are doing some private work.


Ctrl+Shift+Esc: This shortcut directly starts the task manager. While Alt+Ctrl+Del was used to bring out the Task Manager in Windows XP and earlier versions, in Windows 10, Windows 8.1, Windows 8 and Windows 7, it just brings up the lock this computer screen.

Ctrl+Click: This shortcut is useful for opening a link in a background tab. This is useful when you have to load a page without leaving the current one.

Alt+Print Screen: takes the screenshot of the current active window as opposed to just Print Screen which takes the screenshot of the entire screen.

Shift+Click: for Yes to All and No to All: If you have a lot of dialog boxes asking yes and no question, just shift+click Yes or No on one to yes all or no all.

Ctrl+C on an error dialog box to copy its contents: Suppose your computer is giving an error message and you want to copy its contents to send to the support guy, what do you do? Just press Ctrl+C while the dialog box is highlighted and its contents will be copied to your clipboard.

Ctrl+T: This keyboard shortcut opens a new tab in internet browsers.

Ctrl+Shift+T: Reopens the last closed tab.

Ctrl+Shift+N: This shortcut opens a new incognito window in Google Chrome.

Ctrl+Shift+P: Opens a new private window in Mozilla Firefox.

Alt+Enter: after writing the domain name in the address bar of your browser to insert .com automatically.

Shift+Enter: inserts .net domain name extension.

Ctrl+W: This shortcut closes the current tab in your browser quickly.

Ctrl+Backspace: This shortcut deletes the last word you have typed. It is useful in case you typed in a wrong word and want to delete it quickly.

Ctrl+Left or Right Arrow key: This shortcut allows you to move the cursor one word at a time instead of the default one character at a time.

Ctrl++: This shortcut allows you to zoom in web pages in web browsers. Useful when text on a web page is too small to read properly. Ctrl+Scroll wheel can also zoom in documents, file thumbnails and icons in Windows 10, Windows 8.1, Windows 8, Windows 7 and Windows Vista.

Ctrl+-: This shortcut does the reverse of the previous shortcut.

Ctrl+0: Reset the webpage's zoom.

Windows key+M: Minimizes all the open windows.

Ctrl+L: This shortcut allows you to quickly jump to the address bar of your web browser.

Windows key+Pause/Break: Quickly open the system properties dialog box. 

Ctrl+Shift+Delete: This shortcut opens the option to delete your browser's history, cookies, cache and other details that it stores while you browse the internet. This shortcut is extremely useful for the privacy conscious.

Windows Key+L: This shortcut locks your computer.

Ctrl+H: makes the history appear.

CTRL+B: Bold CTRL+U: Underline CTRL+I: Italic.

Alt+Select: This shortcut allows you to select rectangular blocks of text in Word processors, something that is not possible with simple select.

F2: Allows you to rename the selected file.

Holding Shift while inserting a device with removable storage prevents automatic run.

Ctrl+F: This keyboard shortcut opens the Find option in any program.

Ctrl+S: If you are working on a software and want to quickly save your progress, this shortcut will come in handy.

Ctrl+Home and Ctrl+End: Useful for quickly going to the top and bottom of a page.

Ctrl+P: Useful for printing the current page.

Space Bar: While viewing a web page in a browser, pressing space bar moves the page down.

Alt+Tab: Useful for quickly cycling between running applications. Press along with Shift to cycle backwards.

Ctrl+Tab: Cycle between tabs in your browser.

Ctrl+F5: Clears the cache and refreshes the current tab.

Shift+Right click: Open alternate right click options.

Alt+Double click: Open the file's properties. Alt+Enter can also be used for this.


These are some keyboard shortcuts that I found extremely useful. If you know some more useful keyboard shortcuts, do mention them in the comments.

THE END

Useful Keyboard Shortcuts for Windows Computers

Read More

Saturday, 19 March 2016

Make your Computer Welcome You

Do you watch movies? Have you always loved the way how Computers in movies welcome their users by calling out their names? I bet that you too would want to know how you can achieve similar results on your PC and have a computer said welcome. 

Then you are at the right place, this article describes exactly how you can make your computer welcome you like this.

With this trick, you can make your Computer welcome you in its computerized voice. You can make your Windows based computer say "Welcome to your PC, Username."

Make Windows Greet you with a Custom Voice Message at Startup

To use this trick, follow the instructions given below:-


  1. Click on Start. Navigate to All Programs, Accessories and Notepad.
  2. Copy and paste the exact code given below.
Dim speaks, speech
speaks="Welcome to your PC, Username"
Set speech=CreateObject("sapi.spvoice")
speech.Speak speaks
3.  Replace Username with your own name. 
     4.  Click on File Menu, Save As, select All Types in Save as Type option, and save the file as Welcome.vbs or "*.vbs".
     5.  Copy the saved file. 
     6.  Navigate to C:\Documents and Settings\All Users\Start Menu\Programs\Startup (in Windows XP) and to C:\Users\ {User-Name}\AppData\Roaming\Microsoft\Windows\Start Menu\Programs\Startup (in Windows 8, Windows 7 and Windows Vista) if C: is your System drive. AppData is a hidden folder. So, you will need to select showing hidden folders in Folder options to locate it.
     7.  Paste the file.

Now when the next time you start your computer, Windows will welcome you in its own computerized voice. 

Note: For best results, it is recommended to change sound scheme to No Sounds.
You can change the sound scheme to No Sounds by following the steps given below:-

  1. Go to Control Panel.
  2. Then click on Switch to Classic View.
  3. Then Click on Sounds and Audio Devices.
  4. Then Click on the Sounds Tab.
  5. Select No Sounds from the Sound Scheme option.
  6. If you wish to save your Previous Sound Scheme, you can save it by clicking Yes in the popup menu.
  7. Click on OK.
Make your Computer Welcome You

Try it yourself to see how it works. In my personal opinion, this is an excellent trick. Whenever I start my PC in front of anybody and the PC welcomes me, the fellow is left wondering how brilliant a computer do I have.

THE END

Make your Computer Welcome You

Read More

A while ago on IBUVIRUS, I published an article on changing your processor name. But recently,I pointed out that the trick only changed the name temporarily.

After a user restarts his computer, the name reverted back to original which is obvious as each time Windows boots, it checks the connected hardware and updates the registry value automatically. So,changing the processor name using the earlier article did not have permanent results.

Thus, the alien processor name you had earlier again reverted back to the boring old one.


Problem: To, make the name change permanent, it was required to update the Processor Name String registry key every time Windows starts. 

Solution: It is very easy to change your processor name permanently by creating a registry key and placing a shortcut to it in the Windows start up folder. To do so, just follow the steps given below:-


Steps :-
1.  Open Notepad.
2.  Copy and paste the exact code given below:-

Windows Registry Editor Version 5.00

[HKEY_LOCAL_MACHINE\HARDWARE\DESCRIPTION\System\CentralProcessor\0]
"ProcessorNameString"="My Processor name 50000MHz"
To change the processor name, edit the part of the code given in blue. Also understand that \0 in the above code should only be present if Windows store your processor name at that location. Open the Registry Editor and navigate to the above mentioned keys to check whether or not to include the \0.

3.  Click on File Menu, click on Save As and select "All Types" in the Save as Type option. Save the file as ProcessorNameChange.reg or *.reg.
4.  Create a new shortcut on your desktop. Enter regedit / S "Location of the .reg file" as the location of the item. For example, enter regedit /S "C:\Processor Name.reg" if your registry file is located in the root of C:\ drive.

5. Copy the created Shortcut file.
6.  Navigate to C:\Documents and Settings\All Users\Start Menu\Programs\Startup (in Windows XP) or toC:\Users\ User-Name\AppData\Roaming\Microsoft\Windows\Start Menu\Programs\Startup (in Windows 8, Windows 7 and Windows Vista. Also remember that AppData is a hidden folder.)  if C: is your System drive.
7.  Paste the copied file.


This registry file would now execute each time when Windows starts and the Processor Name String would be modified each time. This means that even upon restarting your computer, you will see that the changed processor name is permanent.

THE END

Change Processor Name Permanently

Read More

Are you bored with your old processor? Do you want a new processor with a breath-stopping name but are not going to upgrade any time soon? No need to worry.

 You can still have that new processor's name displayed in your computer. Well not only that, you can also have a better one than the one you are planning to buy. Just follow this trick.


With this trick, you can change the name of your processor to a personalized one like My Processor or something extreme like Decacore Processor 50 GHz .  These are just a few examples. You can change the name of your processor to anything you like.

To have one such cool processor name displayed in your computer, follow these steps:-
  1. Click on Start.
  2. Click on Run.
  3. Type "regedit" without quotes.
  4. Navigate to HKEY_LOCAL_MACHINE/HARDWARE/
  5. From HARDWARE, navigate to DESCRIPTION/System/CentralProcessor/.
  6. In the work area, double click on ProcessorNameString, and change its value according to your choice.
  7. Click OK
Change your Processor's Name

Right click on the Computer icon and select properties.The final outcome would be something like the one in the image.

Try it on your PC and show it to your friends to see the fun.

P.S.: Personally, I have recently changed the name of my processor to "iLife Processor 7, Alien Technologies". Tell me what you change yours to.

Note: This article changes the processor name temporarily. To permanently change processor name, visit:

THE END

Change your Processor's Name

Read More

Fix Windows Xp Corrupted File Easily

Today i will show you how to easily fix Windows xp corrupted files. Its work perfectly on windows xp and might works on windows 7 and windows vista also. Just follow below instruction to fix your corrupted window.


REQUIREMENTS


  • PC Running Windows xp
  • Windows XP CD

HOW TO DO THAT ?


  • Place Windows XP cd in your CD/DVD drive.
  • Then Go to Start > Run 
  • Type in sfc /scannow
  • Now your XP will run fine.
THE END

Fix Windows Xp Corrupted File Easily

Read More

Print OR PDF

Copyright © 2014 HACK WITH VIRUS | Designed With By Blogger Templates
Scroll To Top